Animated Custom Dialogs in Flutter

Tomb Toad features nicely animated little pop-up menus throughout. I am using Flame for a lot of game-related functionality but these were created using standard Flutter widgets. I’ve been asked how to create them, so I’m writing this little tutorial. Hopefully someone learns something!

First, here is a video of the menus we want to achieve:

As you can see the, the menu animates up into position smoothly, but it also simultaneously fades in. The foundation for this effect is going to be Flutter’s showGeneralDialog function. This displays a generic dialog popup and gives the developer a lot of customization options. Our core method will look something like this:

displayDialog({
  BuildContext context,
  Widget Function(BuildContext, Animation<double>, Animation<double>, Widget) transitionBuilder,
  int duration = 250 }) {
  showGeneralDialog(
    context: context,
    pageBuilder: (context, anim1, anim2) {return null;},
    barrierDismissible: false,
    barrierColor: Colors.black54,
    transitionDuration: Duration(milliseconds: duration),
    transitionBuilder: transitionBuilder
  );
}

The important thing here is going to be the ‘transitionBuilder’. More on that in a moment. ‘pageBuilder’ can be left as an empty function that returns null for this exercise.

Now using this method is really simple, here is an example:

displayDialog(
  context: context,
  transitionBuilder: (context, animation, secondaryAnimation, child) {
    return SimplePopup(
      onPressed: dismiss,
      anim: a1
    );
  },
  duration: 1000,
);

As you can see, the function we pass to ‘transitionBuilder’ returns a custom Stateless Widget we created called “SimplePopup”. Also notice how we are passing the ‘animation’ value to the SimplePopup constructor. This is an animated value generated by Flutter that keeps track of the transition’s progress. It ranges from 0 to 1, where 0 is the beginning and 1 is the end of the transition. You can use this value to do whatever you want. (we can ignore ‘secondaryAnimation’ for now too, it’s used for other route transitions) Let’s look at our SimplePopup class now to see how we use the ‘animation’ value:

class SimplePopup extends StatelessWidget {
  final Function onPressed;
  final Animation anim;
  SimplePopup({Key key, this.onPressed, this.anim}) : super(key: key);

  @override
  Widget build(BuildContext context) {
    final curvedValue = Curves.easeInOutQuad.transform(anim.value);
    return Transform(
      transform: Matrix4.translationValues(0.0, (1.0-curvedValue)*200.0, 0.0),
      child: Opacity(
        opacity: curvedValue,
        child: GestureDetector(
          onTap: onPressed,
          child: Dialog(
            shape: RoundedRectangleBorder(
                borderRadius: BorderRadius.zero,
            ),      
            elevation: 0.0,
            child: Container(
              // Add your content in here
            ),
          ),
        ),
      ),
    );
  }
}

There’s a bunch going on here, so let’s break it down.

First, you can see that we are creating a ‘curvedValue’ from our anim value. You can use the raw anim value, but it will create a boring linear transition. So we transform it into a Quadratic easing curve. There are a lot of built-in animation curve functions, so you can experiment to get all sorts of different looks.

Next, we use the ‘curvedValue’ and apply it to the y-coordinate of a Transform widget. Using 1.0-curvedValue, the menu will animate up from the bottom (rather than down from the top). And 200 is the distance it moves.

Nested below is an Opacity widget. Here, we the curvedValue as the opacity, causing the widget to fade in from 0 to 1 opacity.

Below these two is a simple GestureDetector with an onTap event to dismiss the popup. When the popup is dismissed, Flutter will automatically play the transition animation backwards! Pretty cool. To dismiss this popup, simply add this tiny method to the widget that originally called ‘displayDialog’:

dismiss() {
  Navigator.of(context).pop();
}

The last thing in our SimplePopup class is the actual Dialog widget. This is a special Flutter widget that darkens the background and creates a new view on top of the rest of the app. This has a bunch of customization options too, but I’m not going to get into that. But inside this Dialog widget is where you would create all of your menu content.

Well, that’s about all there is to it. It’s not a terribly complex process and hope someone finds it useful.

 

Pocket Gamer Article

Pocket Gamer wrote a short article about Tomb Toad! It’s a pretty glowing preview so give it a read!

https://www.pocketgamer.com/articles/081784/tomb-toad-is-an-inventive-puzzler-for-mobile-which-sees-you-manipulating-your-environment-in-order-to-survive/


Darkness

Been a while since my last update and a lot has happened. For now I’m going to discuss the recent addition of a lighting system to Tomb Toad.

Here’s a video of it in action:

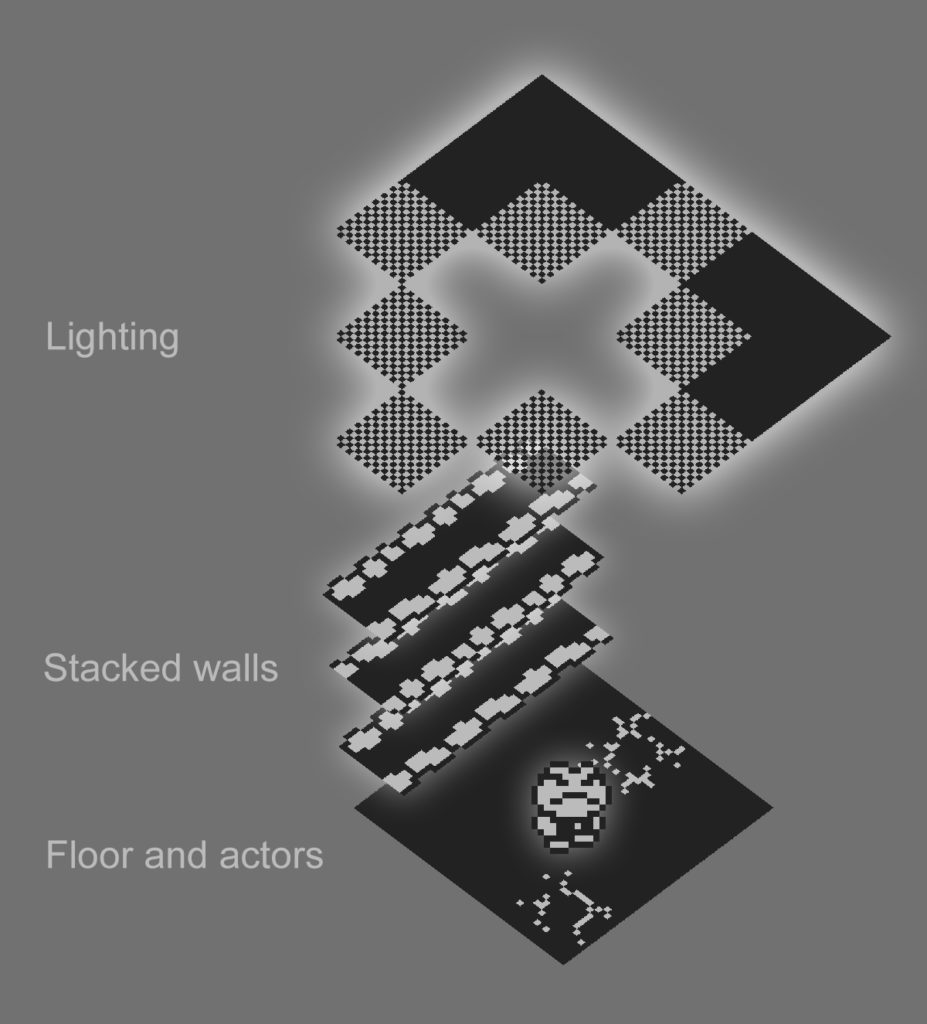
The dithering is an extra layer of tiles drawn on top of everything else. The lighting itself is a simple linear distance falloff. Here’s an illustration of how the various layers are stacked:


Map pathfinding

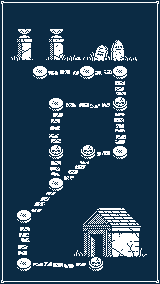
One major thing I’ve been working on recently is the overall game structure. I wanted a Mario-esque overworld map, so I mocked up a simple graveyard for the first tomb-themed world. Something like this:

Navigating this map becomes an interesting problem to solve. On a console, you would use the joypad to move from stage to stage, and then press a button to enter a stage. On mobile, that doesn’t work. Well, unless of course you have an onscreen joypad, which I generally try to avoid.

The preferred interaction would be: tap on any stage anywhere on the map and the player will walk through the world, following the path, until he arrives at the chosen destination (assuming it can be reached). The key phrase being “following the path.” Despite the simplicity of the map this will require a pathfinding solution, mainly because the path can split.

After reading some articles and doing some research, I found this excellent video explaining the A* pathfinding process step-by-step. I’m not going to try to explain the intricacies of the pathfinding problem because this video does it so well. I recommend it to anyone trying to research this stuff.

I was able to implement the pseudo code from this video very quickly and the results were perfect, almost on the first try. It’s surprisingly concise too. Here is the Dart method I came up with for finding the (probable) shortest path through the map:

class PathNode {
  Vector3 pos;
  List<int>edges = []; // indices of connections to other nodes
  int previous;
  int f;
  int g;
}

List<int> pathFinder(List<PathNode> nodes, int start, int end) {
  List<int> path = [];

  var heuristic = (Vector3 a, Vector3 b){
    // calc the 'Manhattan Distance'
    return (b.x - a.x).abs() + (b.y - a.y).abs();
  };

  var current = start;
  var open = ListQueue<int>();
  var closed = ListQueue<int>();

  while (current != end) {
    for (int i in nodes[current].edges) {
      if (!open.contains(i) && !closed.contains(i)) {
        open.add(i);
        var g = heuristic(nodes[i].pos, nodes[start].pos).round();
        var h = heuristic(nodes[i].pos, nodes[end].pos).round();
        var f = g + h;
        if (nodes[i].f == null || nodes[i].f > f) {
          nodes[i].f = f;
          nodes[i].previous = current;
        }
      }
    }
    closed.add(current);
    var low = open.reduce((curr, next) => nodes[curr].f < nodes[next].f ? curr : next);
    open.removeWhere((i){return i == low;});
    current = low;
  }

  path.add(end);
  current = end;
  while (current != start) {
    current = nodes[current].previous;
    path.add(current);
  }

  return path.reversed.toList();
}

And in game it looks like this:


Spiders

I’ve been working on a lot of new mechanics, one of which are these nasty cave spiders that hang from a web and swing around. The dynamics aren’t perfect yet, but they get the point across for now. I’m still trying to figure out how to build puzzles with these and explore the design space.


Fire & Ice

Some new features – fire and ice (as you probably could have guessed from the title). Fire is just a stationary thing that kills you, but doesn’t block movement (this is important because things that don’t die can move through). Ice reduces friction and makes the player slide really fast. Not sure yet if this should effect enemies as well.

This video also shows off my new ‘level theme’ feature. Levels will have different visual themes that change the wall tiles and color palette. This is the snow cave theme. I also have a sewer theme, a rock cave theme, and the standard tomb theme.


Pseudo-3D Tiles

I’ve been asked how I created the 3D effect in my upcoming game, so I thought I’d write up a little explanation without going into too much detail.

The most important thing are the tiles themselves. It’s a simple brick pattern. We only need the bricks on the edges of the tile, but they should be offset so opposite rows don’t line up. This will be important once we stack them. Also note the 1-pixel blue border around the edges of the tile. This will be the mortar between one layer and the one below it.

Now we create 3 layers of tiles, with a simple y-axis offset to simulate the height of the wall. The first and third layers are identical. But the trick here is to rotate the second layer so the bricks don’t line up and we get the alternating brick pattern. (This step is actually a lot more complicated and involves rotating, mirroring, and some other tricks. You may even want to consider a whole new set of tiles for the middle layer. But you get the general idea.)

And here is the result for a whole level.


Tomb Toad

I think I’ve settled on a title for my new game. Expect Tomb Toad to be released in the next couple months, initially on iOS and Android, with desktop to follow sometime afterward, probably on itch.io


New Game!

I’ve recently started a new untitled project and I received a tremendous response from Reddit and Twitter so I’ve decided to start using my devlog again. Here is an early demo video of the game. The gameplay is pretty unique and this gives you a good idea of what it’s all about. I’ve had a lot of questions about technical details so I’ll get into some of that in my next post. Cheers!


Flatiron Update

Flatiron has been out for about a year now and I’ve gotten a bit of feedback.  Due to personal matters, I haven’t been able to update the game until recently, but now I’ve finally started.  Progress has been swift and very beneficial to the gameplay.  Most of the changes are intended to address one primary issue – the game was so random, the player seemed to have no decision-making power.

In the future, I am planning on more frequent updates, which will add new power-ups, new enemies, or whatever.

Some of the more important improvements include:

  • Boss battles
  • Tap to shoot instead of swipe
  • Bombs are shootable
  • New power-ups
  • Simple combo system
  • Improved power-up system

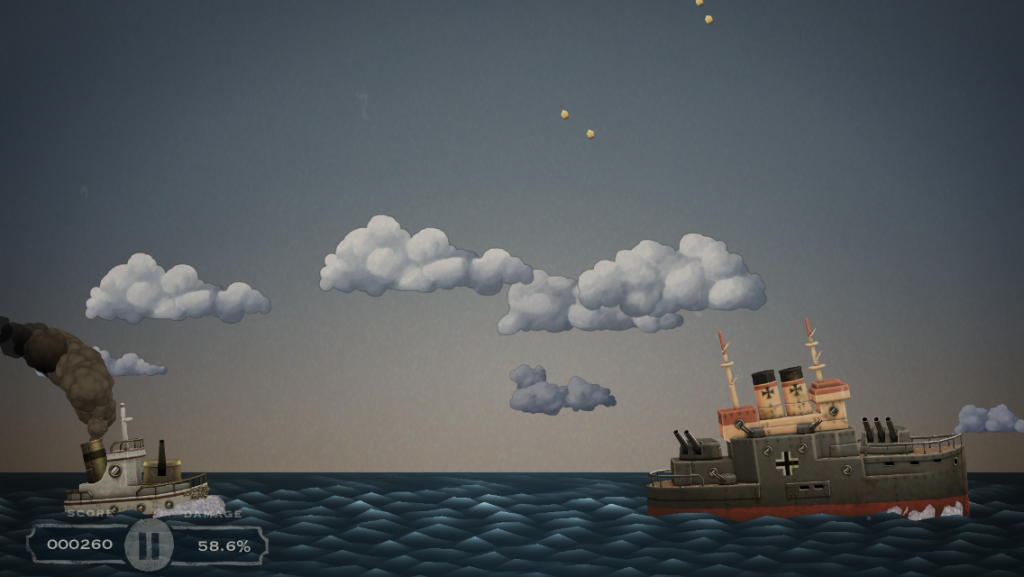
Here’s a screenshot of the first boss – the Dreadnaught.

IMG_1267